Friday, December 31, 2010

Simple LINQ to SQL in C#

This article provides an introduction to employing LINQ to SQL within a Windows Forms application; the article will address the incorporation of LINQ to SQL into a win forms project, how to use LINQ to SQL to select, insert, update, and delete data, and how to use LINQ to SQL to execute stored procedures.  Select query examples will demonstrate ordering, filtering, aggregation, returning typed lists, returning single objects and values, and how to query across entity sets (which are essentially related tables associated by foreign keys).

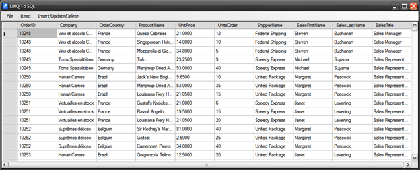
Figure 1:  Application Main Form
The demonstration project included with the article is a simple win forms application; this example contains a datagridview control and a menu; the menu is used to execute each example query contained in the demonstration.
The application provides the following functionality:
  • Return Full Tables
  • Return Typed Lists
  • Return Single Typed Values
  • Insert Data
  • Update Data
  • Delete Data
  • Execute Stored Procedures
  • Select Filtered Lists
  • Select Ordered Lists
  • Perform Aggregate Functions
There is a great deal more that one can do with LINQ to SQL that is not contained in this demonstration however, the demonstration was geared towards the mechanics of performing the most typical types of queries that might be required within a data driven application.
LINQ to SQL Statements
This section will discuss some of the common techniques used in LINQ to SQL statement construction.  In a nutshell, LINQ to SQL provides the developer with the means to conduct queries against a relational database through a LINQ to SQL database model and related data context.  

http://www.c-sharpcorner.com/UploadFile/scottlysle/L2SinCS06022008035847AM/L2SinCS.aspx

Thursday, December 30, 2010

Introducing LINQ

Introducing LINQ is the first part of a series of articles on Language Integrated Query (LINQ). This series will cover the core essentials of LINQ and its use with other technologies like ASP.NET, Win Forms and WPF.
This and the forthcoming articles are designed to be a comprehensive tutorial on LINQ, having completed the series you will have a thorough understanding of LINQ and C# 3.0.
All code in the series will use the latest publicly available CTP at the time of writing.

Introducing LINQ Series

  • Part 1 In this part you will learn how to the query in-memory collections.
  • Part 2 In this part we will look at querying relational data.
  • Part 3 In this part we will look a little more at what entities are, as well as taking a closer look at the key types we can use and their application .
  • Part 4 In this part of the series we will use LINQ, ASP.NET and ASP.NET AJAX to replicate the to-do list that Scott Guthrie created a while back to show off the features of ASP.NET AJAX.
  • Part 5 In this part of the series I will explain the DataContext class in depth through a series of examples and explanations.

  • Read More : http://dotnetslackers.com/articles/csharp/IntroducingLINQ1.aspx

    Friday, December 10, 2010

    Optimized Paging and Sorting in ASP.NET GridView

    Introduction

    Paging and sorting are most commonly used features of ASP.NET GridView. And it is very easy to use/implement these features in GridView with small chunk of lines. In this article I am going to demonstrate what are the performance drawbacks of using conventional way to page and sort your GridView and then I will demonstrate 'An Optimized way to implement Paging and Sorting'.

    What are conventional steps for Paging and Sorting?

    Usually we perform the following steps to enable paging and sorting in our GridView.
    1. Set AllowPaging and AllowSorting Properties of GridView to True to enable paging and sorting respectively e.g
    view sourceprint?
    1.<asp:GridView ID="GridView1" runat="server" AllowPaging="true" AllowSorting="true"  >
    2. </asp:GridView>
    2. Set the PageSize property to mention how many records will be display on each page.
    3. Set the SortExpression property of each column. By default each Data Bound columns has the bounded column name as default value for the SortExpression property.
    4. Handle PageIndexChanging and Sorting Events of GridView to respond to paging and sorting actions respectively, like so:
    view sourceprint?
    01.<asp:GridView ID="GridView1" runat="server" AllowPaging="true"
    02.            AllowSorting="true" onpageindexchanging="GridView1_PageIndexChanging"
    03.            onsorting="GridView1_Sorting"  >
    04.        </asp:GridView>
    05. protected void GridView1_PageIndexChanging(object sender, GridViewPageEventArgs e)
    06.{
    07.}
    08.protected void GridView1_Sorting(object sender, GridViewSortEventArgs e)
    09.{
    10.}
    5. Put some logic in the event handlers to do their jobs
    5a. In the PageIndexChanging Event Handler method, we usually get the data from database or somewhere from the Cache and rebind our Grid with that data. After rebinding we change the PageIndex property of the GridView to a new page index to display the page that was selected by the user.
    view sourceprint?
    1.protected void GridView1_PageIndexChanging(object sender, GridViewPageEventArgs e)
    2. {
    3.     GridView1.DataSource = GetData(); // GetData() is a method that will get Data from Database/Cache/Session to display in Grid.
    4.     GridView1.DataBind();
    5.     GridView1.PageIndex = e.NewPageIndex;
    6. }
    5b. In the Sorting event handler method, we get the sorted data according to the sort expression from our data source (data source could be database/cache/session etc) and then rebind the Grid to display the sorted records.
    And that's it.

    Drawbacks

    In conventional way of paging and sorting we get complete set of data instead of getting only the portion of data that is required to display on current/requested page. As you can see on each pageIndexChanging call we are getting all the data from our data source and then binding it to the GridView. Ideally we should get only the data that we need to display on the requested page.

    Hmmm...Sounds good but HOW??

    The question that may arise in your mind could be "It seems good in theory that we should only get the required data, but practically if we bind only one page of data with GridView then it would assume that this is the only data that it needs to display. So how does the GridView even display page numbers and total records count? It is a genuine question, so let's try to answer!

    An Optimized Way to implement Paging and Sorting

    As in the start of this article, we discuss the conventional 5 steps to implement paging and sorting in ASP.NET GridView . In this solution we will use the first 3 steps as described above, and perform the 4th and 5th steps by ourselves. We will use an ObjectDataSource that will perform these steps for us in an optimized way.

    http://dotnetslackers.com/articles/gridview/Optimized-Paging-and-Sorting-in-ASP-NET-GridView.aspx

    Multi File Upload Using JQuery!

    Herewith I have explained and given the code for multiple file upload using jquery.
    We know all the normal upload functionality. But someone of us wants the multiple file upload in .NET. Here jquery makes that very easy.
    We just use the same asp:fileupload control. If you want to accept only jpg,png only you no need to go for a customvalidator tocheck the file extension. You just add the accept="jpg|png". Thats it. It allows only files which has the extension of above.
    Ok let us see the code below,

    HEAD SECTION:
    <script src="Scripts/jquery-1.3.2.js" type="text/javascript"></script>
    <script src="Scripts/jquery.MultiFile.js" type="text/javascript"></script>
     
    BODY TAG:
    <div>

    <asp:FileUpload ID="fupImage" runat="server" class="multi" accept="" />
    <br />
    <asp:Button ID="btnUpload" runat="server" Text="Upload All" OnClick="btnUpload_Click" />
    </div>

    Thats it about in the UI page(aspx).
    Let us see the code behind page,

    the following code should be inside in the upload button event,

    try

    {
    // Get the HttpFileCollection
    HttpFileCollection hfc = Request.Files;
    Guid newid = new Guid();
    newid = System.Guid.NewGuid();
    for (int i = 0; i < hfc.Count; i++)
    {
    HttpPostedFile hpf = hfc[i];
    if (hpf.ContentLength > 0)
    {
    hpf.SaveAs(Server.MapPath("Files") + "\\" +
    System.IO.Path.GetFileName(newid + hpf.FileName));
    Response.Write("Uploaded Successfully <br/>");
    }
    }
    }
    catch (Exception ex)
    {
    // ERROR OCCURED
    }

    http://dotnetworldblog.blogspot.com/2010/04/multi-file-upload-using-jquery.html

    Light Weight PopUp

    Here we have a javascript and CSS code to create a light weight popups
    on Code Behind
    <div>
    <input id="Button1" type="button" value="Click To Popup" onclick="ShowDiv('DivOrderSearch','DivLayer')" />
    </div>
      <div id="DivLayer" class="DialogueBackground">
    </div>
    <div id="DivOrderSearch" style="width: 400px; height: 300px; background-color: #D9E0E6;"
      class="Dialogue">
      <div class="DialogueTitle">
    Popup Sample
    </div>
      <div class="DialogueImg" onclick="HideDiv('DivOrderSearch');" title="Close">
    </div>
    <div style="padding: 10px;">
    Hello World
    </div>
    </div>

    Add javascripts

    function HideDiv(PopUpDiv) {
    var DivPopUp = document.getElementById(PopUpDiv);
    var DivLayer = document.getElementById('DivLayer');
    DivPopUp.style.display = "none";
    DivLayer.style.width = "0%";
    }
    function ShowDiv(PopUpDiv, LayerDiv) {
    var DivPopUp = document.getElementById(PopUpDiv);
    var DivLayer = document.getElementById(LayerDiv);
    DivPopUp.style.display = "block";
    DivLayer.style.width = "100%";
    DivPopUp.style.top = document.documentElement.clientHeight / 2 - DivPopUp.style.height.replace('px', '') / 2 + 'px';
    DivPopUp.style.left = document.body.offsetWidth / 2 - DivPopUp.style.width.replace('px', '') / 2 + 'px';
    return false;
    }

    Few Css Classes

    .DialogueBackground
    {
    background-color: Gray;
    filter: alpha(opacity=50);
    opacity: 0.50;
    position: fixed;
    left: 0;
    top: 0;
    width: 0%;
    height: 100%;
    }

    .Dialogue
    {
    background-color: White;
    display: none;
    z-index: 2;
    border: 1px solid Black;
    position: fixed;
    text-align: center;
    }
    .DialogueImg
    {
    height: 30px;
    position: absolute;
    width: 27px;
    float: right;
    background-image: url(../images/closebox.png);
    cursor: pointer;
    right: -15px;
    top: -15px;
    background-repeat: no-repeat;
    border: 0;
    }
    .DialogueTitle
    {
    font-size: small;
    font-weight: bolder;
    padding: auto;
    height: 25px;
    color: #ffffff;
    position: relative;
    background: url(../images/app_tab2.jpg) repeat-x;
    top: 0px;
    }

    Export to PDF file in ASP.Net – Gridview to PDF, ASPX Page Content to PDF

    Creating data driven application is one of the most commonly done task in our day today application development. In these applications, reporting and generating reports in various formats is one of the repeated requirements we will get. Read the article Export to Excel in ASP.Net 2.0 – Gridview to Excel, DataTable to Excel which discusses some handful of techniques to export the data to excel file. Apart from excel reports, generating PDF report is one of the most common reporting requirement we will get in data driven application. Exporting data to PDF format is not a straight forward task like we do for excel file generation. To do this, we have to employ some 3rd party component or develop a component ourselves by understanding the PDF file standards.

    Since, developing a component ourselves is complicated and time consuming task we can try using any free 3rd party component available in the market. In this article, we will try using one of most widely used PDF generation component called iTextSharp or iText PDF component.

    According to iText PDF official site,
    iText is a library that allows you to generate PDF files on the fly.
    iText is an ideal library for developers looking to enhance web- and other applications with dynamic PDF document generation and/or manipulation.

    In this article, we will see about,
    1.      Simple PDF generation from an in-memory string or HTML string
    2.      Export Page Content to PDF
    3.      Export GridView control to PDF

    Steps
    1.      Open Visual Studio 2008, Click File >Website and choose ASP.Net Website.
    2.      Select a language of your choice. I have selected C#. You can name your website as per your need.
    3.      Download the iText PDF component from the official site (or from here) and add it to your project through add reference dialog box.

    http://www.codedigest.com/Articles/ASPNET/344_Export_to_PDF_file_in_ASPNet-Gridview_to_PDF_ASPX_Page_Content_to_PDF.aspx

    ASP.NET Application Folder

    http://www.codeproject.com/KB/aspnet/AspNetAppFolder.aspxOverview - ASP.NET Application Folders

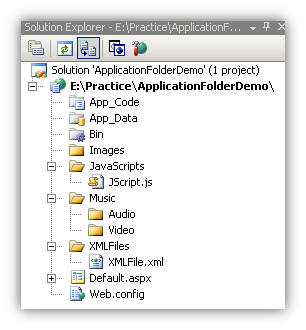
    ASP.NET 2.0 uses a file-based approach. That means, all class files, resource files, data files and folders are maintained in a hierarchical structure. If we are working with ASP.NET 2.0, we can add files and folders using the Add Items option. If we look at a sample application hierarchy, it will look like the following figure.
    beginn1.jpg
    We can add as many as files and folders as we like (according to our requirements) within our solutions,and it won't be necessary to recompile them each and every time they are added. It is ASP.NET'stask to dynamically compile them when required. So, what ASP.NET 2.0 does is, it uses a predefined folder structure containing the files (classes, images, resources, etc.), to compile them dynamically and we can access those files throughout the application. ASP.NET also provides special folders to maintain files and resources. Let's see the advantages of using these folders.

    Advantages of ASP.NET Application Folders

    Following are the main advantages of use of ASP.NET's Application Folders
    • We can maintain resources (classes, images, code, databases, themes) in an organized manner, which allows us to develop and maintain sites easily
    • All files and folders are accessible through the application
    • We can add as many files as required
    • Files are compiled dynamically when required 

    http://www.codeproject.com/KB/aspnet/AspNetAppFolder.aspxhttp://www.codeproject.com/KB/aspnet/AspNetAppFolder.aspx

    Partial Classes in ASP.NET

    Partial class is a new functionality that is included in Visual Studio .Net 2005 and is supported in ASP.Net 2.0. This new functionality helps you to split a single class into multiple partial classes. These partial classes can be in different individual files.

    In the earlier versions of Visual Studio .Net 2005, while you create an ASP.Net application, you might have seen that a single class has to be in a single file. You will be beginning a class and ending that class in the same file. It was not possible to split a single class across multiple files. This new feature, partial class, allows you to allot different developers to develop the code for different functionalities that are available in a single class. These functionalities can be developed in partial classes and then compiled to form the required assembly.

    In the previous versions of the Visual Studio .Net IDE, when you create a new ASP.Net webform, the name of the web form is used as a class in the code-behind file. Apart from that, you would have seen lots of code generated by Visual Studio .Net itself. In the latest version of the Visual Studio .Net IDE, the codes that are generated by Visual Studio .Net are in a separate file as a partial class. Hence a user who creates a new webform would see a partial class for that page, when the user uses the code-behind file. This way the code that is seen in the code-behind file is minimal for a particular webform.

    The compilers for VB.Net or C# look for the partial classes and integrate them while compiling, to form the intermediate language. This intermediate language is the same when compared to the intermediate language that is generated, if all the partial classes are combined to form a single class in a single file. There is no modification done in the CLR for the implementation of partial classes.

    http://www.dotnet-guide.com/partialclasses.html

    Consuming webservices

    http://www.asp.net/ajax/documentation/live/tutorials/ConsumingWebServicesWithAJAXTutorial.aspx

    Monday, December 6, 2010

    Use jQuery and ASP.NET AJAX to build a client side Repeater

    There was some interesting discussion on Matt Berseth‘s blog recently, regarding methods for building and displaying markup on the client side. Though I haven’t posted any examples here before, rendering markup on the client is a technique that I use often and recommend.
    By sending only data to the client, you can profoundly reduce the size of what you send and see a substantial increase in performance. You also allow yourself the ability to easily add features like light-weight sorting and paging on the client. This can not only improve your users’ experience, but reduce server load and bandwidth requirements.
    To that end, I’m going to walk you through these four steps to effectively implementing a client side Repeater, using ASP.NET AJAX and jQuery:
    • Create an RSS Reader page method to return JSON data to the client.
    • Call that page method with jQuery.
    • Use the returned data to build a table on the client side.
    • Improve upon the table creation with a templating plugin.

    Creating an RSS reader page method

    Because web browsers prohibit cross-domain AJAX functionality, displaying items from an external RSS feed is a good real-world example. To overcome this limitation, our first step is to write a local server side proxy to relay that feed data to the client.
    A web service or page method is ideal for this task. I would typically use an ASMX web service, but let’s use a page method here. It’s useful to illustrate how nearly interchangeable the two really are.
    [WebMethod]
    public static IEnumerable GetFeedburnerItems(int Count)
    {
      XDocument feedXML = 
        XDocument.Load("http://feeds.encosia.com/Encosia");
     
      var feeds = 
        from feed in feedXML.Descendants("item")
        select new
        {
          Date = DateTime.Parse(feed.Element("pubDate").Value)
                         .ToShortDateString(),
          Title = feed.Element("title").Value,
          Link = feed.Element("link").Value,
          Description = feed.Element("description").Value
        };
     
      return feeds.Take(Count);
    }
    This page method uses LINQ to parse a few details out of the RSS feed, create an anonymous type with that data, and then return a collection of those anonymous types. By selecting only the data we’re interested in on the server side, we can minimize the traffic between client and server.
    In response to my recent deferred content loading post, several of you asked how to limit the results, so I added that this time around. The Take extension method performs this task for us.

    Calling the page method with jQuery

    On the client side, the first thing we need to do is initiate a request to the page method. We’ll do this with jQuery’s ajax() method:
    $(document).ready(function() {
      $.ajax({
        type: "POST",
        url: "Default.aspx/GetFeedburnerItems",
        // Pass the "Count" parameter, via JSON object.
        data: "{'Count':'7'}",
        contentType: "application/json; charset=utf-8",
        dataType: "json",
        success: function(msg) {
          BuildTable(msg.d);
        }
      });
    });
    When the page loads, this function will perform an AJAX request to our page method, requesting information on the first seven feed items. When the response arrives, a JavaScript function will be called with the response data.
    If you are unfamiliar with this jQuery syntax, I have covered it in more detail in two previous posts: Using jQuery to directly call ASP.NET AJAX page methods and Three mistakes to avoid when using jQuery with ASP.NET AJAX.

    Building and displaying the table

    The page method’s JSON response is going to be similar to this:
    [{"Date":"6/5/2008",
      "Title":"3 mistakes to avoid when using jQuery with ASP.NET AJAX",
      "Link":"http://encosia.com/2008/06/05/3-mistakes-to-avoid-when-using-jquery-with-aspnet-ajax/",
      "Description":"Three common problems that I've seen when using jQuery with ASP.NET AJAX, their underlying causes, and simple solutions to them."},
     
     {"Date":"5/29/2008",
      "Title":"Using jQuery to directly call ASP.NET AJAX page methods",
      "Link":"http://encosia.com/2008/05/29/using-jquery-to-directly-call-aspnet-ajax-page-methods/",
      "Description":"An example of how to use jQuery to call an ASP.NET AJAX page method, without using a ScriptManager."}]
    The anonymous type in our LINQ query comes through very nicely. The properties that we designated in the page method become keys in an associative array, making it easy for us to work with the data.
    To build a table of this data on the client side, we can loop through each element, construct an HTML string, and then assign that string to a container’s innerHTML property:
    function BuildTable(msg) {
      var table = '<table><thead><tr><th>Date</th><th>Title</th><th>Excerpt</th></thead><tbody>';
     
      for (var post in msg)
      {
        var row = '<tr>';
     
        row += '<td>' + msg[post].Date + '</td>';
        row += '<td><a href="' + msg[post].Link + '">' + msg[post].Title + '</a></td>';
        row += '<td>' + msg[post].Description + '</td>';
     
        row += '</tr>';
     
        table += row;
      }
     
      table += '</tbody></table>';
     
      $('#Container').html(table);
    }
    If you think that code looks ugly, that’s because it is. While it works great, I would not recommend this implementation. It will be difficult for you to maintain, and you’ll hope that anyone else forced to maintain it doesn’t know where you live.

    Improving the situation with templating

    The reason the former code is so ugly is that the presentation and logic are not separated. Even though this is all on the client side, separation of concerns is still an important goal to keep in mind.
    To achieve separation, what we really need is a templating solution. As it turns out, there’s a great jQuery plugin called jTemplates, which is perfect for this application.
    Using jTemplates, we can create a simple HTML template like this one:
    <table>
      <thead>
        <tr>
          <th>Date</th>
          <th>Title</th>
          <th>Excerpt</th>
        </tr>
      </thead>
      <tbody>
        {#foreach $T.d as post}
        <tr>
          <td>{$T.post.Date}</td>
          <td><a href="{$T.post.Link}">{$T.post.Title}</a></td>
          <td>{$T.post.Description}</td>
        </tr>
        {#/for}
      </tbody>
    </table>
    Since we’re focusing on disentanglement, this template belongs separate file. If we embedded in our JavaScript, we’d be taking two steps forward and one step back. In this case, I saved it as RSSTable.htm.
    Note: I originally used the suffix .tpl for templates, but found that some versions of IIS will block access to them unless *.tpl is explicitly added as a valid filetype.
    With the HTML template created, we can use a couple of jTemplates’ methods to apply the template to the container and then render the page method’s return.
    function ApplyTemplate(msg) {
      // This method loads the HTML template and
      //  prepares the container div to accept data.
      $('#Container').setTemplateURL('RSSTable.htm');
     
      // This method applies the JSON array to the 
      //  container's template and renders it.
      $('#Container').processTemplate(msg);
    }
    The rendered result will be identical to the previous, manual method, but the code is much cleaner. At this level of abstraction, I consider this method to be very similar to a client side Repeater.

    Conclusion

    This is a powerful optimization technique. Identifying overburdened UpdatePanels and replacing them with something like this yields massive performance increases. An order of magnitude isn’t uncommon, in my experience.
    One of my sites, WinScrabble.com, was suffering from poor performance due to its primary feature relying on partial postbacks. Because the page was simple and had ViewState disabled, I thought the UpdatePanel would have a relatively minimal impact.
    You wouldn’t believe just how wrong I was.
    When I removed the UpdatePanel and replaced it with this technique, changing none of the underlying algorithms, requests for 7-8 letter searches ran over 400% faster. I have no doubt that you’ll be able to realize similar improvements in your projects.
    In upcoming posts, I’ll go into detail about how to add some client side embellishments: Client side sorting, light-weight paging, and using CSS to improve upon the presentation. So, if you aren’t already subscribed to receive updates via RSS or Email, be sure to do so today.

    Download Source From: http://encosia.com/2008/06/26/use-jquery-and-aspnet-ajax-to-build-a-client-side-repeater/
    ASP.NET Menu with jQuery Superfish

    Choosing the right type of menu for a website is not easy at all. The ASP.NET Menu Control is definitely NOT a good starting point due to the horrendous markup it renders, nor is it good for SEO because of the Markup/Content ratio, neither can it be easily styled.
    Of course there is the CSSFriendly Control Adapters project that started back in 2006, which made the the ASP.NET Menu (and many other ghastly markup rendering controls) render beautiful <div> based markup. In the case of the Menu it rendered <div> and <ul>-<li> type markup which is probably the most widely spread technique used for creating menus known to mankind.

    You need use the same sort of markup for your server side ASP.NET Menu control like you’ve used with the standard CssFriendly Menu Adapter, and make the JavaScript call needed to set the Superfish plugin up.
    view sourceprint?
    01.<asp:Menu ID="mnu" runat="server" CssSelectorClass="myMenu">
    02.    <Items>
    03.        <asp:MenuItem NavigateUrl="#" Text="Item1">
    04.            <asp:MenuItem NavigateUrl="#" Text="Sub1 Item1"></asp:MenuItem>
    05.            <asp:MenuItem NavigateUrl="#" Text="Sub1 Item2"></asp:MenuItem>
    06.            <asp:MenuItem NavigateUrl="#" Text="Sub1 Item3"></asp:MenuItem>
    07.            <asp:MenuItem NavigateUrl="#" Text="Sub1 Item4"></asp:MenuItem>
    08.        </asp:MenuItem>
    09.        <asp:MenuItem NavigateUrl="#" Text="Item2">
    10.            <asp:MenuItem NavigateUrl="#" Text="Sub2 Item1"></asp:MenuItem>
    11.            <asp:MenuItem NavigateUrl="#" Text="Sub2 Item2"></asp:MenuItem>
    12.            <asp:MenuItem NavigateUrl="#" Text="Sub2 Item3">
    13.                <asp:MenuItem NavigateUrl="#"
    14.                              Text="Sub2 Item3 Item1 and some
    15.                                    very very very long text">
    16.                </asp:MenuItem>
    17.                <asp:MenuItem NavigateUrl="#" Text="Sub2 Item3 Item2"></asp:MenuItem>
    18.                <asp:MenuItem NavigateUrl="#" Text="Sub2 Item3 Item3"></asp:MenuItem>
    19.            </asp:MenuItem>
    20.        </asp:MenuItem>
    21.        <asp:MenuItem NavigateUrl="#" Text="Item3">
    22.            <asp:MenuItem NavigateUrl="#" Text="Sub3 Item1"></asp:MenuItem>
    23.            <asp:MenuItem NavigateUrl="#" Text="Sub3 Item2"></asp:MenuItem>
    24.            <asp:MenuItem NavigateUrl="#" Text="Sub3 Item3"></asp:MenuItem>
    25.        </asp:MenuItem>
    26.        <asp:MenuItem NavigateUrl="#" Text="Item4"></asp:MenuItem>
    27.    </Items>
    28.</asp:Menu>
    The necessary JavaScript:
    view sourceprint?
    01.<script type="text/javascript">
    02.    // initialize plugins
    03.    $(function() {
    04.        $("ul.sf-menu").supersubs({
    05.            minWidth: 13,
    06.            maxWidth: 40,
    07.            extraWidth: 5
    08.        }).superfish();
    09.    });
    10.</script>
    And the outcome looks like …


    View More Detail & Source Code : http://blog.dreamlabsolutions.com/post/2009/08/09/ASPNET-Menu-with-jQuery-Superfish.aspx

    Store and Display Images from MS Access Database Using C#


    using System.Data.OleDb;
    OleDb is used to connect the web site forms with MS Access Database using Microsoft.Jet.OLEDB.4.0
     
    using System.IO;
    IO is used to create the memory stream variable that can store the binary format of the image content.
     
    C# Code to Upload Image to MS Access Database:
     
    int imageSize;
    string imageType; Stream imageStream;
    // Gets the Size of the Image
    imageSize = fileImgUpload.PostedFile.ContentLength;
     
    // Gets the Image Type
    imageType = fileImgUpload.PostedFile.ContentType;
     
    // Reads the Image stream
    imageStream = fileImgUpload.PostedFile.InputStream;
     
    byte[] imageContent = new byte[imageSize]; int intStatus; intStatus = imageStream.Read(imageContent, 0, imageSize);
     
    Connection string to connect the ASP.Net 2.0 web application with MS Access Database:

    Download & View More Detail : http://programming.top54u.com/post/Store-and-Display-Images-from-MS-Access-Database-Using-C-Sharp.aspx

    Saturday, December 4, 2010

    WPF Sample Series – Using WPF Binding StringFormat Property with Nullable Types

    One of the great features introduced in .NET 3.5 Framework Service Pack 1 is the BindingBase StringFormat property.  When used in a data binding expression the StringFormat property replaces most IValuteConverters that were used for formatting of values in  WPF 3.0 & WPF 3.5 applications.
    Here are two examples of the StringFormat property in action formatting a currency field:
    <TextBox Text="{Binding Path=Salary, StringFormat=c}" />
    
    <TextBox Text="{Binding Path=Salary, StringFormat=\{0:c\}}" />

    Nullable Type in the Mix

    If you are binding to a non-Nullable data type the above will work just fine.
    However, if you are binding to a Nullable data type the above will not work.
    This breaks down when a UI Control like a TextBox as a value and the user clears the TextBox and press TAB.  The default implementation of StringFormat will attempt to set the Target Property to an empty string which in the the case of a Nullable Decimal property will cause the following or similar data binding exception.  The below data binding exception can be viewed in the Visual Studio Output window.
    Exception
     
    System.Windows.Data Error: 7 : ConvertBack cannot convert value ” (type ‘String’). BindingExpression:Path=Age; DataItem=’Customer’ (HashCode=31884011); target element is ‘TextBox’ (Name=”); target property is ‘Text’ (type ‘String’) FormatException:’System.FormatException: Input string was not in a correct format.
    at System.Number.StringToNumber(String str, NumberStyles options, NumberBuffer& number, NumberFormatInfo info, Boolean parseDecimal)
    at System.Number.ParseInt32(String s, NumberStyles style, NumberFormatInfo info)
    at System.String.System.IConvertible.ToInt32(IFormatProvider provider)
    at System.Convert.ChangeType(Object value, Type conversionType, IFormatProvider provider)
    at MS.Internal.Data.SystemConvertConverter.ConvertBack(Object o, Type type, Object parameter, CultureInfo culture)
    at System.Windows.Data.BindingExpression.ConvertBackHelper(IValueConverter converter, Object value, Type sourceType, Object parameter, CultureInfo culture)’

    TargetNullVaue to the Rescue

    In the above example, the exception is thrown because of a type mismatch.  In WPF 3.0 and 3.5 I had a set of Nullable ValueConverters for my applications to handle this problem.
    Another great feature introduced in .NET 3.5 Framework Service Pack 1 is the BindingBase TargetNullValue property.  This property can be used to handled the type mismatch problem when converting an empty string from a TextBox to Nothing (null) when the binding pipeline sets the target Nullable property.
    Let’s have a look at the two below TextBoxes.
    <TextBox
        Grid.Column="1"
        Grid.Row="1"
        Margin="0,11,11,11"
        VerticalAlignment="Top"
        Text="{Binding Path=NumberOfComputers,
                TargetNullValue={x:Static sys:String.Empty},
                StringFormat=\{0:D\}}" />
    
    <TextBox
        Grid.Column="1"
        Grid.Row="2"
        Margin="0,11,11,11"
        VerticalAlignment="Top"
        Text="{Binding Path=Age, StringFormat=\{0:D\}}" />
    These TextBoxes are both bound to Nullable properties.  The first TextBox takes advantage of the TargetNullValue property and works as expected.  The second does not.   The data binding pipeline will throw an exception when the second TextBox is changed to an empty string and it attempts to assign the value of String.Empty to the Target property.
    Here is a potential problem.  If the exception gets thrown and swallowed because the code didn’t check for this, the user thinks they cleared a value but the property the TextBox is bound to never gets changed due to the exception being thrown.

    How To Create Crystal Report In C#

    1). Create XML File That Used In this Reports.
    So,How To Create That XML File.
    1). To Creating that XML Using Dataset.
    2). First Fill Dataset From DataAdapter.After That there is one property WriteXMLSchema Of Dataset.In this Property write the XML FIle Name.
    2). After Creating that XML File.Right Click On Project And Click On  Add New Item.While Click On that One Open Dialog Box Appear.From that Dialog Box Click On Crystal Report.That will Add One Crystal Report On your Solution.
    3). After Creating Rpt File Follows That Following Steps.
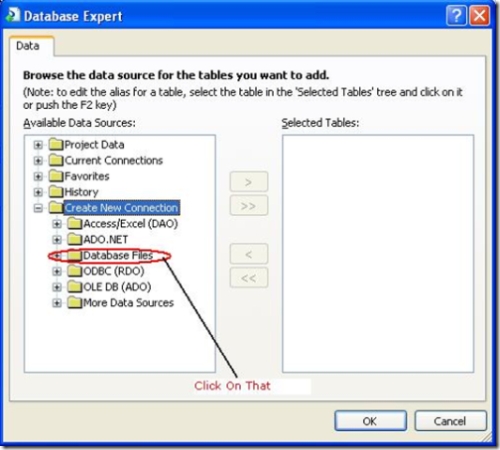
    1). Add Datasource Of that newly created Crystal Report And Click On Database Expert… link.


    2). Click On That One Dialog Box Appear that Describe below.


    3). When Expand that Database files Option It will ask the Location Of that XML give.Give the location Of that XML File.


    4). After Click On Open Button This Screen Appear.From That Choose the Table that will see on that Report.


    4). All This Task Complate That Write the below code For Bind the Data To ReportViewer .
    ReportDocument rdoc = new ReportDocument();
    // Path Of That Report Document File In Load Function Parameter.
    rdoc.Load(@”C:\Documents and Settings\xosysadmin\My Documents\Visual Studio 2005\Projects\GivingXMLToRpt\GivingXMLToRpt\Testrpt.rpt”);
    // Give the Dataset Name That Assing To Report Document
    rdoc.SetDataSource(ds);
    // Viewer Name . ReportSource = That Report Document Object Name
    crystalReportViewer1.ReportSource = rdoc;

    Create Thumbnail Images In C#

    A thumbnail is a small sized image. Creating a thumbnail using .NET is extremely simple. In this article, we will explore how to create a thumbnail image and display the thumbnail in our application. Follow these steps:
    1. First Add Windows Form In your Application. After that Drag & drop 1 Label ,  1 TextBox , 2 Buttons , 1 PictureBox & 1 OpenfileDialogBox Controls From Toolbox. Now change all the names of the controls that mention belowed.
    2.    1: TextBox Name = 'txtPath'
         2: 1st Button Name = 'btnOpen'
         3: 2nd Button Name = 'btnGenerate'
         4: PictureBox Name = 'picthumb' And Set Height & Width = 100,100
    3. After renaming All the controls On the ‘btnOpen’ click display the File Open dialog box and accept the selected .jpg file in the ’txtPath’ textbox.
    4.    1: private void btnOpen_Click(object sender, EventArgs e)
         2:         {
         3:             if (openFileDialog1.ShowDialog().ToString() == "OK")
         4:             {
         5:                 txtPath.Text = openFileDialog1.FileName;   
         6:             }
         7:         }
    5. Next, on the ‘btnGenerate’ click, add the following code:
    6.    1: private void btnGenerate_Click(object sender, EventArgs e)
         2:         {
         3:             Image Img = null;
         4:             Img = Image.FromFile(txtPath.Text);
         5:             Image ImgThumbs = Img.GetThumbnailImage(100, 100, null, new IntPtr());
         6:             if (ImgThumbs != null)
         7:             {
         8:                 picthumb.Image = ImgThumbs;
         9:             }   
        10:         }
      The code creates an Image object from the image supplied in the textbox. Using the Image.GetThumbnailImage(), the code then creates a thumbnail image with a size of 100*100.
      The Image.GetThumbnailImage() takes in four arguments :
         1: Width : in pixel of the thumbnail image that is to be generated
         2: Height : in pixel of the thumbnail image that is to be generated
         3: Callback : a Image.GetTumbnailImageAbort delegate to prematurely cancel execution
         4: CallbackData : of type IntPtr to represent a pointer or a handl